It can be difficult to make the natural voice of the video script clear and understandable. Most creators fail to do quality voiceovers that are professional and interesting. You have a bad voiceover, and your video is boring and difficult to follow. This issue can be addressed with the help of AI-based Text-to-Speech (TTS) tools.
These devices transform written texts into natural-sounding narration within several minutes. You do not have to take hours recording and editing your voice.
You can easily create quality narration of your scripts with CapCut Desktop Video Editor. Its TTS option allows you to create voiceovers on the videos and even make independent audio for your project. This simplifies and accelerates video creation and makes it more refined.
Natural voice narration Text-to-Speech AI
Text to Speech AI can be of great help to those who are recording a video. In case you record your own voice, it may be time-consuming. Good microphone and editing skills are also required. These issues are eliminated by TTS tools. They are able to give real and smooth voices.
You get to select the style, tone, and speed of voice. This assists you in developing narration that suits your video very well. Videos can be made faster using TTS. You use the same voice in numerous videos. You are able to experiment with various voices without the need to record once more.
CapCut Desktop Video Editor is a simple TTS that is integrated into the software. One has only to type or paste in his script and then press a button to produce the voice.
Certain sophisticated voices and effects can be paid for. This ensures that it is quicker and the script is easily readable by TTS, which is clear.
Steps to Generate Natural Voice Narration for Your Script
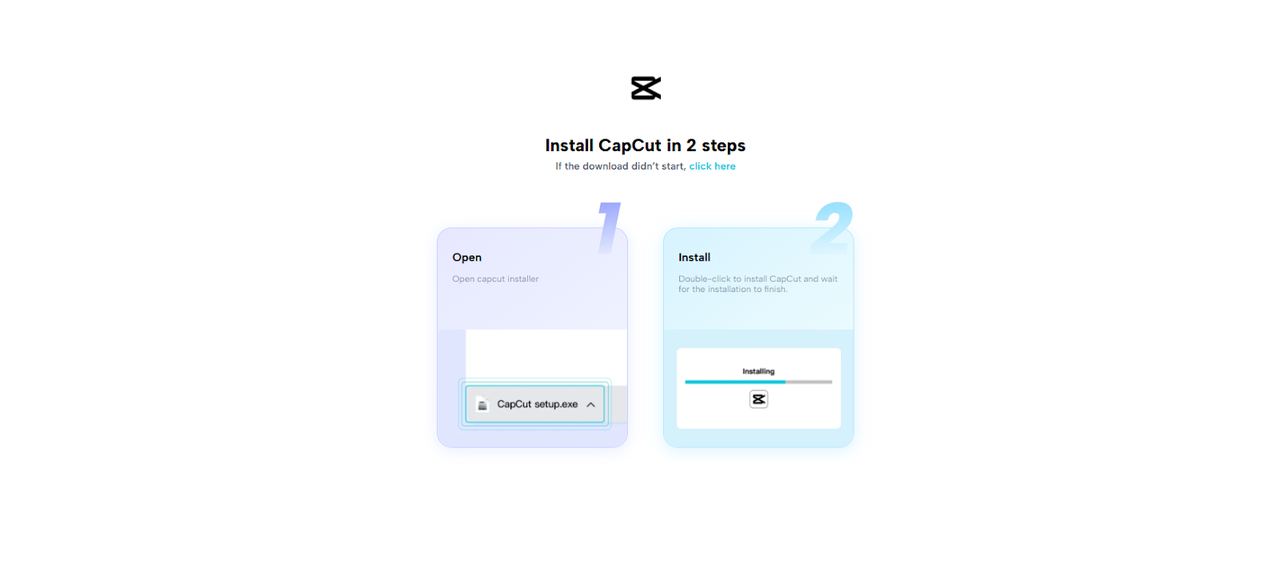
Step 1: Download CapCut Desktop Video Editor
To begin with, visit the official webpage of CapCut, download the CapCut Desktop Video Editor. Select either the Windows or Mac version and install the version following what is displayed on the screen.
Ensure that your system is fitted with the requirements of smooth processing of AIs, such as sufficient memory and storage. CapCut Desktop Video Editor is compatible with a stable system so that TTS and other functionalities can operate without drawbacks.
Note that although CapCut PC provides numerous free functions, a paid subscription is needed to have more advanced TTS voices and effects, and tools like AI avatar. Upon installation, open the software and begin working on your project.
 Step 2: Select Your Script or Import Video
Open CapCut Desktop Video Editor on your PC. To begin with a blank canvas, click on New Project. In case you have the video already, you can upload it and just choose it on the device.
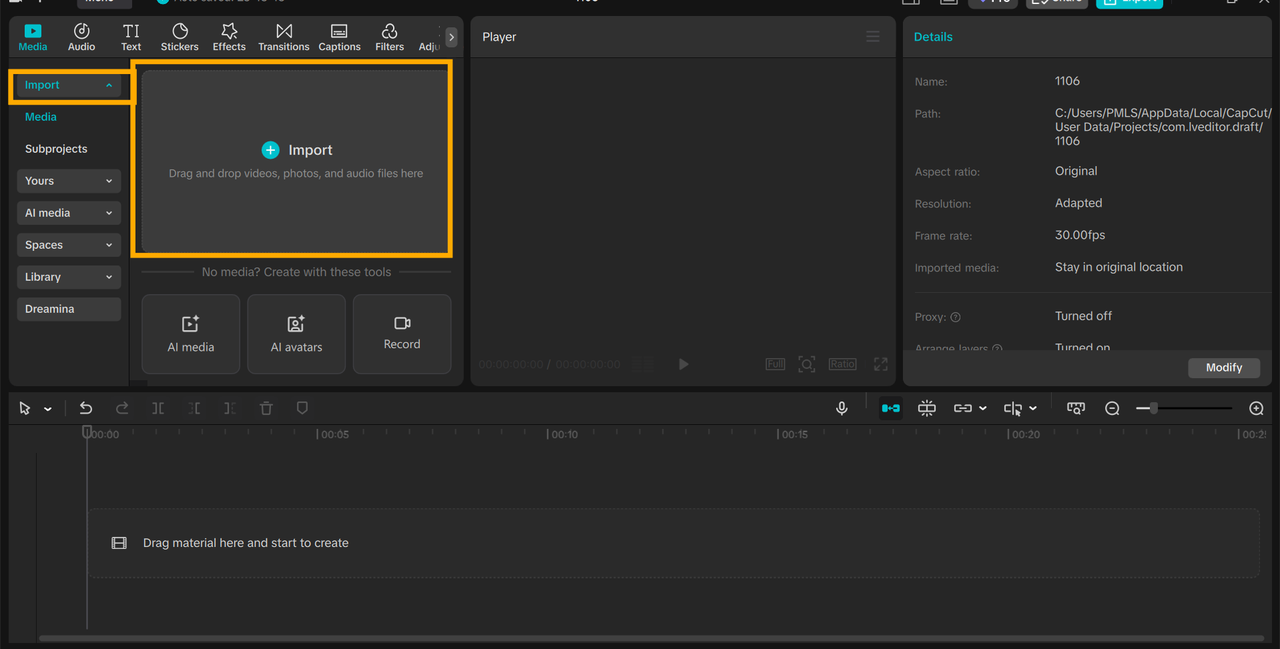
In case you are just interested in creating voiceover audio, a blank canvas will suffice. Ensure that the project is prepared to apply TTS. Clarity scripts are the most effective since AI narration comes across them more naturally.
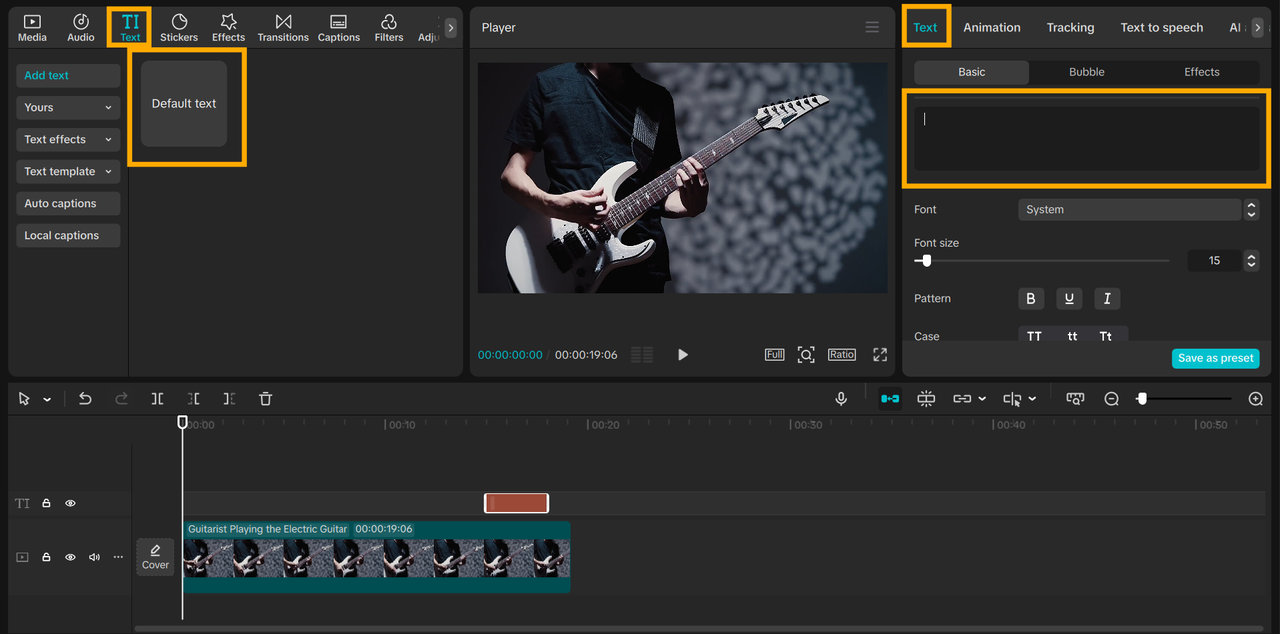
Click on Text and then the default text to add your content. Write on the canvas or paste your text there in case you have no video yet. By doing this, you will be sure that the narration will flow in harmony with your video content.
After uploading either your script or video, you can proceed to the creation of the voice. Time saved here is used in the next steps through proper preparation.
Step 3: Turn the Text into the Natural Voice
When your text is prepared, you may press the button Text-to-Speech and hear your text with the voice of a person. It is possible to select the type of voice and gender that suits your video.
Some adjustments are needed on speed, pitch, and tone to get it just right. It is also possible to apply effects, minimize noise in the background, and fade in or fade out to make the audio smooth. Advanced effects or some of the premium voices might be paid for.
The narration will be produced by CapCut PC in a few seconds and will save you several hours of recording and editing. This will streamline your work process and keep a neat one, so that all voice records are in the correct scene of your video.

Step 4: Export & Share Your Video
When your video is ready, go into CapCut Desktop Video Editor and click on Export. Choose the file name, resolution, format, and quality to your requirement. The completed video can be downloaded to your PC or shared directly to social media, such as TikTok and YouTube.
Your video is ready to be shared because the voiceover created by AI retains its natural sound. This will bring the process to completion, and you will be able to share a polished video with professional narration quickly and easily.

Conclusion
Install CapCut Desktop Video Editor to make your videos professional in terms of narration. TTS saves time and provides you with voiceovers of high quality and natural sound.
It is important to remember that there are also higher voices and effects, and they are paid for on subscription. To test how it would change, try creating a voice narration on your next project.
You can make your videos more interesting, understandable, and professional-looking with AI-powered TTS in CapCut Desktop, and not spend hours on the record. Try it and make your video content shine with natural narration nowadays.